Those who suffer from sciatica know that it can present differently for different individuals. Some will express a dull or throbbing pain in the lower back, while others feel shooting pain running up and down their leg or thigh. Others even experience intense pain radiating from their lower back all the way down to their feet. There are the lucky ones who report minimal symptoms, and unfortunately, those who experience all of the above. Sciatic nerve pain can often lie dormant until something triggers another flare-up or episode. A casual sneeze or cough can be enough to initiate a sciatic flare-up, wherein severe pain resurfaces for an extended period of time. All of this is to say that sciatica can be fickle and unpredictable, as variables like type of pain, degree of severity, and affected regions present differently in any given patient. The sciatic nerve originates in the lower back, runs through the buttock, and can be traced down the back of the leg. Once the nerve reaches the back of the knee, it branches out into two separate nerves that travel all the way down to the foot. The sciatic nerves are the largest nerves in the body, causing sciatic symptoms to be all over the map. Due to the capricious nature of sciatica and nerve pain, treatment options and outcomes are dependent on the presence or absence of the aforementioned variables. This is why patients often encounter extreme difficulties on their journey to pain relief. In studies conducted to measure efficacy of treatment options, the commonality is apparent: physical exercise is a viable option for the reduction of sciatic pain. In a 2018 study intending to research the effects of yoga for sciatica, 30 sciatic patients were monitored for a period of 30 days. By the end of the trial, over 76.8% of patients reported pain relief. 80% also reported both relief in stiffness and tingling/prickly sensations, both of which are extremely common symptoms of sciatica. Similar studies have been conducted with positive results, leading many medical professionals to recommend yoga as an effective option for sciatic relief. We’ve curated a few yoga poses that have proven useful in minimizing sciatica symptoms. Pain relief is a mere few stretches away!
Cobra Pose
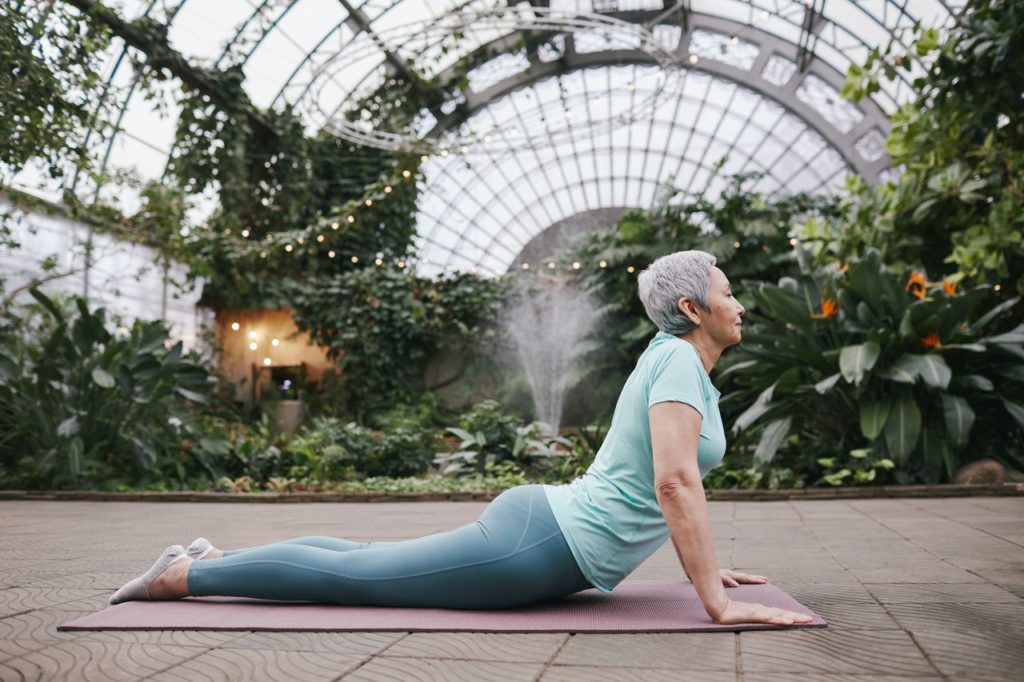
Pose Benefits:
- Combats stiffness and pain in the lower back: Cobra Pose is a go-to for those who feel stiffness and tightness in the lumbar spine. This pose both stretches and strengthens the spine. Why is it important to strengthen the back? When our lower back muscles are weak, our bodies are forced to compensate by using other structures to receive support. Over time, this can cause pain and increase the risk of injury. Cobra pose can eliminate back pain and, with consistent practice, reduce the chances of injury and pain in the future.
- Stretches and strengthens the core: practicing Cobra stretches and strengthens the abdominal muscles, resulting in a stronger core. By developing a strong core, you can greatly reduce the risk of back injuries. This will also promote good posture, which is one of the most beneficial things you can do for your spinal health. If your daily lifestyle requires you to sit at a desk for hours at a time, Cobra Pose is great for counteracting the effects of poor posture.
- Other benefits: strengthens biceps & triceps, promotes chest expansion for more functional breathing, and corrects rounded shoulders
Pose Instructions:
- Begin by coming down to your mat and laying flat on your stomach. Then, place your palms flat down on either side of your armpits and attempt to tuck your elbows closer to your sides.
- On your next inhalation, push off your palms and lift your chest off the mat. Make sure your elbows are still tucked at your sides, and that your shoulders are rolled back.
- From here, you can lift your chest further up off the mat to create a curved spinal arch. If attempting to lift your chest higher up causes any pain or physical distress, do not push yourself. Remain at a height in which you feel most comfortable.
- You may remain in this pose for up to 30 seconds before lowering yourself back down. You may then cycle through the pose again, or move on to a different pose.
Knees-to-Chest Pose
Pose Benefits:
- Effectively stretches the piriformis muscle: the piriformis is a muscle located deep within the buttock, and that runs in close proximity to the sciatic nerve. When the piriformis muscle is too tight, it sets off a chain of reactions. This often leads to a compressed sciatic nerve, causing intense pain that can radiate anywhere from the lower back to the foot. Stretching the piriformis muscle not only feels great, but it can also effectively relieve pain emanating from the sciatic nerve.
- Gently stretches the lower back: keeping the lower back limber can reduce tension in the back muscles and relieve pain in the lumbar region. With a flexible back, you can also achieve greater range of motion and overall mobility. While there are many viable poses to choose from to achieve spinal flexibility, Knees-to-Chest Pose is revered as a gentle pose that can provide the same benefits as more advanced stretches.
- Other benefits: massages the abdominal organs, improves blood circulation, and boosts the digestive system
Pose Instructions:
- Begin by coming down to the mat and lying on your back. Give your knees a bend, and draw them towards your chest. Wrap both arms around your legs. If you’re able to, you can clasp both elbows using hands from opposite sides.
- Your shoulders may have a tendency to scrunch up. If you feel this happening, roll them back so as to keep them away from your ears. When your shoulders are softened and located underneath you, your chest will be able to open up more into the pose.
- If you would like to deepen the stretch, try tucking your chin in closer towards your chest. Your head will naturally lift up. You may also practice this pose using only one leg. Sciatica often presents on one side; if this applies to you, you can modify many poses to only be performed on one side of your body.
- Hold this pose for up to one minute. You can release whenever you’re ready, with the option to repeat the pose or move onto a different one!
Reclined Pigeon Pose
Pose Benefits:
- Stretches the hips & piriformis muscle: sciatic nerve pain can be caused by piriformis syndrome. Piriformis syndrome is a disorder that causes the piriformis muscle (located deep within the buttock) to spasm and irritate the sciatic nerve. Treatment for this form of sciatic nerve pain often begins with hip and pelvis stretches. As Reclined Pigeon actively targets the piriformis muscle, you should be able to derive pain relief from this pose. Additionally,
- Other benefits: stretches the hamstrings & lower back muscles, decompresses the spine, and improves blood circulation
Pose Instructions:
- Begin by lying flat on your back, with your legs straightened under you and arms on either side of your body.
- Bend your knees, allowing the soles of your feet to be firmly planted on the mat. Using your hand, establish a grip on your left ankle and place it over your right thigh.
- Thread your left arm underneath your right thigh. Then, thread your right arm under your right thigh. Allow your left and right hands to make contact, interlacing your fingers together.
- Using your interlaced fingers, draw your right thigh closer towards you. Your left ankle should remain atop your right thigh. Try to keep your feet flexed.
- Hold this pose for a few moments, focusing on your breath work. When you’re ready to release, unlace your fingers and slowly bring your right foot down to the mat. You can use one or both hands to assist in uncrossing your left leg, eventually planting your left foot on the mat. Repeat this pose on the other side if you feel comfortable doing so.
Downward-Facing Dog Pose
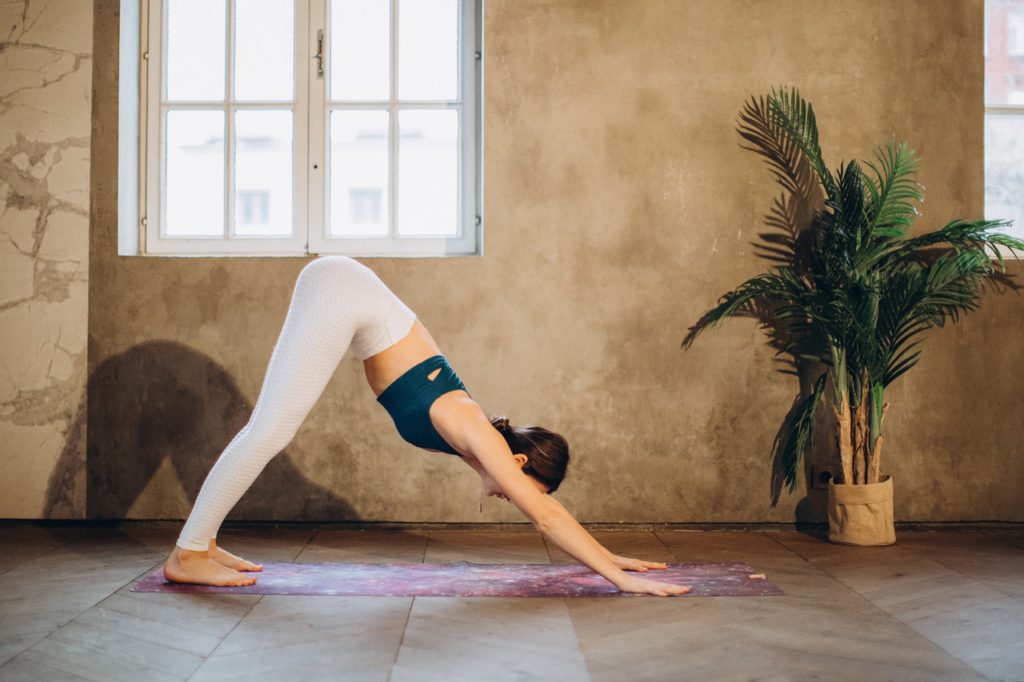
Pose Benefits:
- Stretches the hamstrings & reduces sciatic nerve pain: tight hamstrings are one of the leading reasons that the piriformis muscle will become irritated. Hamstrings refer to the three thigh muscles located between the hip and the knee. When discussing back pain, hamstrings don’t come up as often as they should. Tight hamstrings actually increase lower back stress, which often leads to back pain and discomfort. Stretching out the hamstrings can relieve sciatic nerve pressure and ultimately, relieve lower back pain. While many daily activities actively target certain parts of our body, the hamstrings are rarely engaged by the stretches they desperately need. In order to loosen and stretch tight hamstrings, targeted stretches need to be performed. Downward-Facing Dog provides a great hamstring stretch, and can subsequently reduce back pain.
- Promotes spinal alignment: spinal misalignment is all too easy to achieve. It takes only a fraction of a millimeter in misalignment between spinal bones to cause misalignment that cascades throughout the rest of the spine. The spine will overcompensate to make up for this misalignment, but this often leads to unnecessary pressure on the sciatic nerve. By realigning the spine, pressure can be taken off of the nerve and relieve pain throughout the lower back and leg. Downward-Facing Dog does this well by straightening the vertebrae. Practicing Downward Dog pose on a daily basis can realign your spine and correct many of the subsequent issues that accompany spinal misalignment.
- Other benefits: improves circulation, promotes good posture, builds bone density (which greatly reduces the risk of developing osteoporosis), and strengthens the stabilizing muscles in the feet (thus reducing the risk of walking and running injuries).
Pose Instructions:
- Begin by entering into Tabletop Pose, propping yourself up on hands and knees. Ensure that your hands are stacked under your shoulders, and that your knees are stacked under your hips.
- Tuck your toes in, and begin shifting your weight onto the palms of your hands. Then, on your next exhalation, lift your knees off the mat. From here, lift your hips up higher, as though they are attempting to reach for the ceiling. As you adjust into this position, you may maintain a slight bend to your knees.
- Once you have settled into Downward-Facing Dog, you may attempt to straighten your knees out. However, if you find this challenging, you can revert back to bending your legs slightly, as straightened legs are not a requirement for this pose. I often like to bounce and pedal both feet when entering my first Downward Dog of the day; it’s a great way to warm up into this pose, and never fails to give my hamstrings a good stretch.
- At this point, your body should resemble a triangular slope. You may remain in this pose for a minute or two; base your duration time on how comfortable you feel. When you are ready to release, slowly bend your knees and return down to the mat.
As beneficial as these poses can be, it’s always best to consult with a physician before engaging in new exercises and stretches. As we discussed, sciatica presents differently, with varying degrees of severity in each patient. We all have individual limitations and boundaries that should be addressed and identified before trying new exercises for the first time. When it comes to your health, it’s immensely crucial to make judicious decisions! For more resources on pain management and sciatica, we highly recommend checking out MixPose’s targeted class schedule or trying a personalized session with one of our instructors! Our daily yoga classes are led by skilled instructors, all of whom are qualified to help you modify yoga poses to appease any existing limitations or conditions you may have. We offer live classes that specifically target issues like back pain and knee pain to help streamline your needs!