Exercises That Strengthen The Lower Back
Not-so-fun fact: within the U.S., lower back pain is the fifth most common reason that people will see their doctors for. Those who have experienced back pain will attest to the fact that it makes performing even simple tasks that much more difficult. It can be incredibly debilitating to one’s quality of life, but it doesn’t have to be! Certain types of lower back pain are largely preventative, which is why we feel it’s crucial to consistently highlight the importance of spinal health. If your muscles around the low back are weak, your body will rely more on passive structures for stability, such as your ligaments and the spinal bones or discs which lie between the spinal bones. You can imagine that this can cause pain. Research has backed this notion that back-strengthening exercises can be an effective treatment for lower back pain relief.
When looking for strengthening exercises, it’s important to think of the full core, 360° strength around the spine – that includes the abdominal muscles at the front of your body. Your core includes:
- Front abdominal muscles — the rectus abdominis.
- Muscles along the side body — the internal and external obliques.
- A deep muscle that wraps around the front — the transverse abdominal.
- Muscles in your back that are located between your spine bones, running along your spine — the erector spinae and multifidi.
By strengthening your back muscles, you create a solid spinal foundation that’s able to better withstand laborious activities and prevent serious back conditions from developing. Spending 20 minutes a day performing exercises that strengthen the lower back can vastly improve your quality of life and keep chronic back pain at bay. When it comes to your health, we always encourage taking the proactive route. Simply taking little steps every day – whether it’s opting for a healthy food choice, or carving out a few minutes to stretch – add up and will lead to a healthier you. That being said, give these exercises a go today and bulk up those back muscles!
Bridge Pose
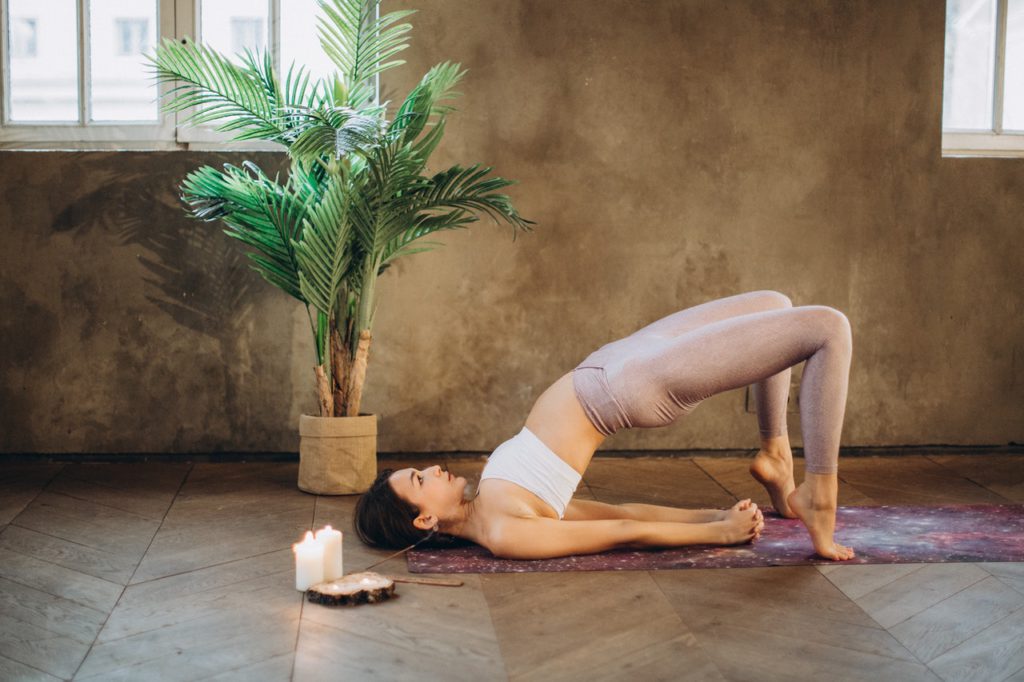
- Begin by laying flat on your back with knees bent at hip-distance apart and both feet planted on the mat. Allow your arms to lie at your sides.
- Plant the palms of your hands face-down on the floor. Gently lift your hips and buttocks off the ground and toward the ceiling. Your back will follow suit accordingly, and your shoulders and arms will remain planted on the floor.
- If you’d like, you may interlace your fingers together under your buttocks. Keep in mind that your arms and hands should still be firmly grounded to the floor.
- Maintain this pose for a few deep breaths as you concentrate on each inhalation and exhalation. This should help release any tension from your body and assist you in avoiding any inadvertent clenching.
- Slowly release your hips and gradually bring them back down to the ground. If your body allows, you may repeat this set 2-3 times, or as you see fit.
Supine Spinal Twist
- Come down to your mat and lie on your back. While keeping the soles of your feet planted on the mat, bend both knees.
- Slowly bring your right knee up and hug it towards your chest as you straighten your left leg out. On your next exhalation, cross your right knee over to the left side of your body. Be sure to maintain the bend in your right knee, even after it’s crossed over to the left side.
- Straighten your arms out on either side so that your upper body forms a T-shape. Splaying your arms out in this T-shape will help ensure that your right shoulder remains flat on the mat throughout this pose. You may also tuck your right foot into the crook of your left knee if you find this comfortable.
- With your right leg crossed over to the left side of your body, you have the option of turning your head to the right. This will deepen the twist and further engage the neck and body. However, this step is entirely optional as it may be uncomfortable for some.
- Hold this pose for a few breaths. Then, when you’re ready to release, you may uncross your right knee and begin to straighten it out. Try this pose on the other side, with your left knee crossing over onto the right side of your body.
Balancing Table Pose
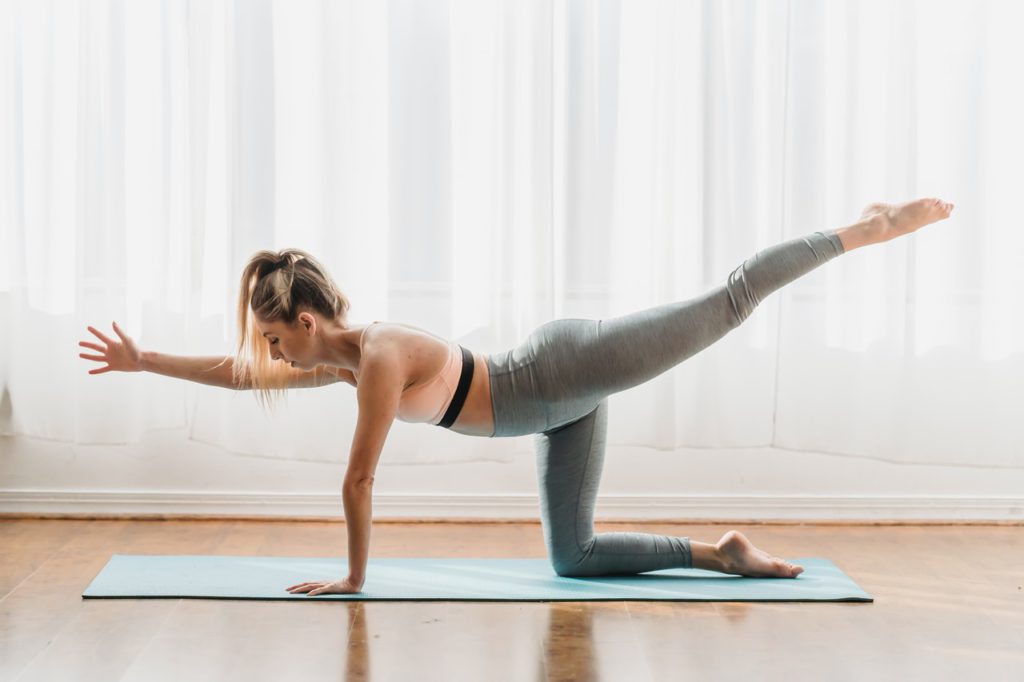
- Begin by entering standard Tabletop Pose – coming down to your mat on hands and knees, with your hands in line with your shoulders, and your knees stacked under your hips. Both your knees and hips should be spaced about hips-distance apart. If your toes are tucked, untuck them so that the tops of your feet lay flat on the mat.
- Once you have settled into standard Tabletop Pose, extend your right arm out and straighten it. It should be elevated at about shoulder-height.
- Next, extend your left leg out behind you. With your left leg now extended in the air, straighten it out and try to create a straight line between your spine and your right arm.
- Hold this pose for a few moments as you focus on your breath work. When you’re ready to release, come back down to Tabletop Pose. Repeat this pose on the other side, with your left arm and right leg extended.
The Superman
- Begin by coming down to your mat and laying flat on your belly, with legs straightened behind you and your arms straightened and extended in front of you. Your palms can be laid down flat on your mat.
- Engage your core on your next inhalation, and lift your arms and legs off the mat. Your chest, head, and thighs will follow suit and ascend from the mat as well.
- Hold this position for a few seconds, continuing to lift yourself higher with each inhalation.
- On your next exhalation, bring your body back down to the mat. Take a moment to rest here, then repeat. You can continue this for as few or as many sets as you’d like, as cycling through Superman sets is shorter and quicker than most other poses.
Knee-to-Chest Stretch
- Begin by lying on your back, with knees bent and the soles of your feet planted down on the mat.
- With both hands, grip your bent left knee and direct it up towards your chest. If you’re able to, wrap both arms around your lifted knee and hug it towards your chest, remaining in this position for 10 seconds.
- Release your left knee and place it back in its starting point. Repeat this stretch on the other side, pulling your right knee to your chest. You may cycle through this stretch as many times as you’d like!
For those currently experiencing back pain or any serious physical conditions, please consult with your doctor before engaging in these exercises and stretches. While most of these poses are beginner-friendly, we all have individual limitations and boundaries that should be addressed and identified before trying new exercises for the first time.
For more on a healthy back, we recommend checking out MixPose’s targeted class schedule or trying a personalized session with one of our instructors! Our daily yoga classes are led by skilled instructors, all of whom are qualified to help you modify yoga poses to appease any existing limitations or conditions you may have. We offer live classes that specifically target issues like back pain and neck pain to help streamline your needs!