From the outside looking in, yoga may appear somewhat intimidating: a room full of people locking their legs behind their heads, standing on their hands in unison, and moving their limbs in ways that seem anatomically impossible. Fortunately, yoga is entirely attainable for all skill levels, body types, and ages. Moreover, yoga is about much more than testing the limits of your strength and flexibility; at its core, it’s about getting in touch with your spirituality, finding peace within yourself, and becoming more in tune with your body’s needs. At MixPose, we pride ourselves on our welcoming community as well as our accessibility. While we offer classes for various skill levels, we understand that it can be difficult to take that first leap. In an effort to help those who are still on the fence, we’ll be walking through a few basic beginner’s yoga poses and their adjoining modifications that you can try out at home so you can get a better idea of what yoga is all about. These will hopefully give you a boost in confidence when you decide to take the plunge and walk into your first yoga class!
Crescent Lunge: this pose is great for opening up the hips and stretching out the quadriceps. Crescent will not only build upon your flexibility training, but will also help you improve your balance.
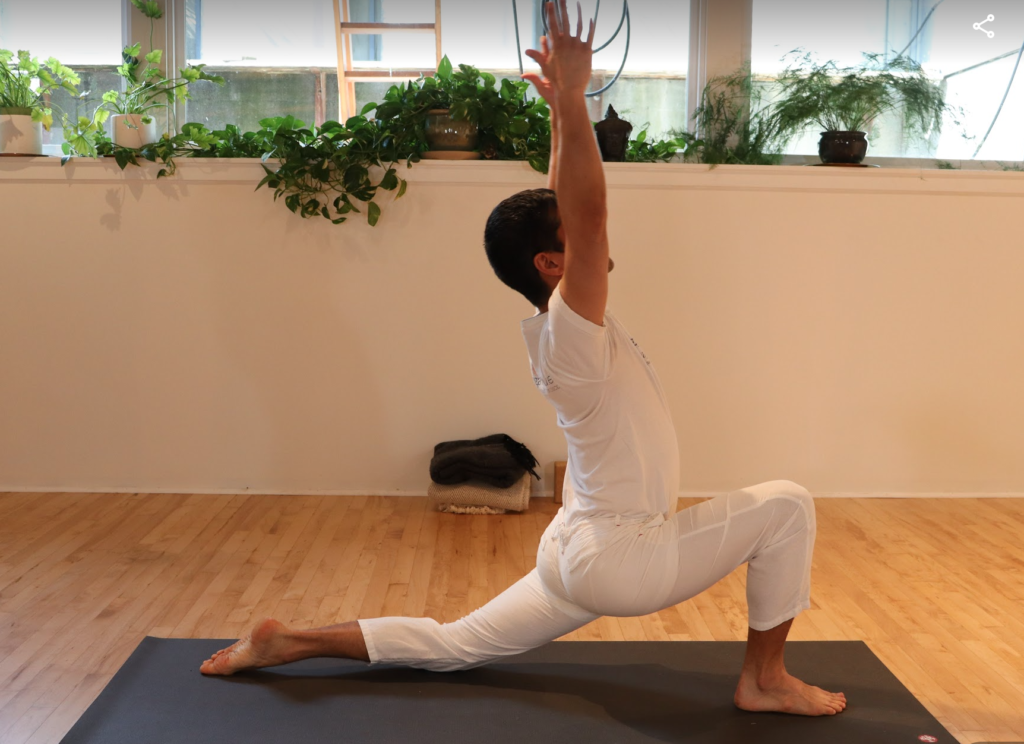
- To begin, stand towards the back of your mat before bringing your right foot towards the front of your mat as you gradually bend your right leg. Your left leg will remain straight for this pose.
- With both feet facing towards the front of the room, adjust your body weight as you come to the ball of your left foot so that your left toes are tucked. Your right foot will remain planted on the mat.
- Check to see that your hips are parallel to the front of the room. Draw your arms up on either side as you reach for the ceiling. As the upper half of your body strives to stretch up, allow your lower body to remain grounded. If your body allows you to, you may sink your hips deeper towards the mat.
- Inhale and exhale in this position for a few breaths, and slowly rise up to cycle through Crescent Lunge with your left foot forward and right leg back.
Crescent Lunge Modification:
- If you’re having trouble maintaining your balance, you may drop the palms of your hands down to the mat on either side. Your upper body will sprawl over your right leg (or left leg, depending on which is currently in forward stance). You may allow your head to lightly rest on your knee.
- A secondary option for balance modification calls for placing your hands on your hips; this will allow your upper body to remain upright.
Plank Pose: this is an excellent strength-training pose that will do wonders for your core strength. Additionally, Plank Pose is great for spinal alignment, which will subsequently improve your posture!
- Begin by setting yourself up in a classic pushup position – start down on all fours before straightening your arms and legs out. Lift your heels up so that you are on the balls of your feet.
- If you are able to do this pose in front of a mirror, it will help a great deal in assessing your posture. Your hovering body – neck, spine, hips, and legs – should ideally form a fairly straight line, though this may take some practice to achieve.
- Hold this pose for a few breaths before slowly bringing your body down to the mat. From here, you can enter Child’s Pose to provide your body with a comfortable recharge.
Plank Pose Modifications:
- Plank Pose requires a great deal of arm and core strength, so do not feel frustrated if you’re not able to hold this pose. Alternatively, you can bring your knees down to help hold some of your body weight while keeping your arms straight out and palms planted on the mat. Try to maintain a straight line within the upper half of your body and head. This is called Half Plank Pose.
- Another alternative is Forearm Plank: after entering a classic plank pose, you may bend your arms and rest your forearms on the mat. Your legs will remain lifted off of the mat and as you try to tuck your core in towards your spine. This is a great modification that will help you achieve the same effects as a classic Plank Pose.
Warrior II Pose: this is a great strengthening pose that will target your arms, legs, and shoulders, while stimulating your abdominal organs. It will also promote stability and balance as Warrior II requires the alignment of your entire body.
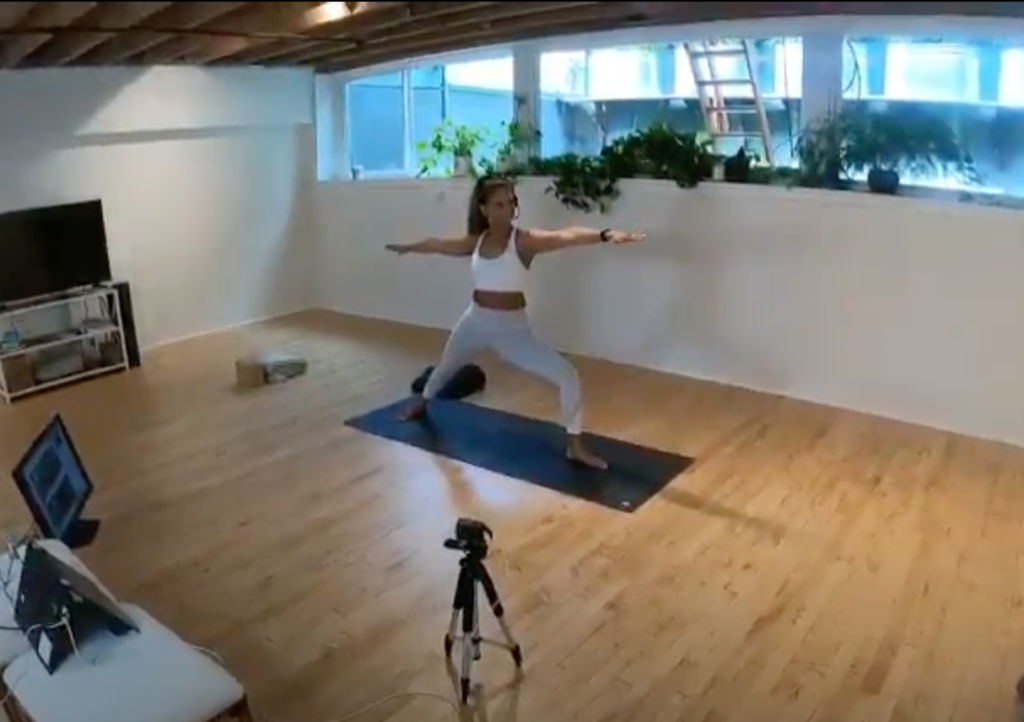
- Begin by standing straight at the top of your mat, with your arms at your sides. Next, take a large step back with your left foot towards the back of your mat. Your right foot should be aligned with the front of the room. Adjust your left foot so that your toes are pointed outward at a rough 45 degree angle.
- Bend your right knee, so much so that your knee will ideally be stacked over your right ankle. You may begin to feel a burn circulating throughout your right leg – it may feel slightly uncomfortable, but over time, yogis will learn to savor that burn. Both of your hips should face the front of the room.
- Bring your arms up parallel to the mat, with your right arm stretched out in the direction of your right leg and your left arm in the direction of your left leg. Be mindful of any tension buildup in your shoulders, and try to relax them downwards so that they are not bunched up in the direction of your head. Allow your gaze to remain on your right fingertips.
- You may remain in this pose for 30-60 seconds, before slowly bringing your arms down and bringing your left foot forward to meet your right foot.
- Cycle through this pose once again, this time by stepping your right foot back, while your left foot remains towards the front of the mat.
Warrior II Modifications:
- While Warrior II is a staple found in many yoga routines, it is by no means easy. If you find that your legs are bearing too much, you may bring your back foot closer to your front foot, thereby narrowing the stance and lightening the weight off your legs.
If you have any underlying physical conditions, it’s best to consult with your physician before practicing any of these poses. Additionally, try to be patient with your body when performing these exercises, and keep in mind that it can often take quite a bit of practice to master a yoga pose. For all the beginners out there: swing by one of our free MixPose yoga classes and come see what all the fuss is about!